To get started, you'll need to gather all the required tools and materials, which you can find on the original post over at the Instructables website. Now it's time for the fun part!
Step 2: Measure, Plan & Design
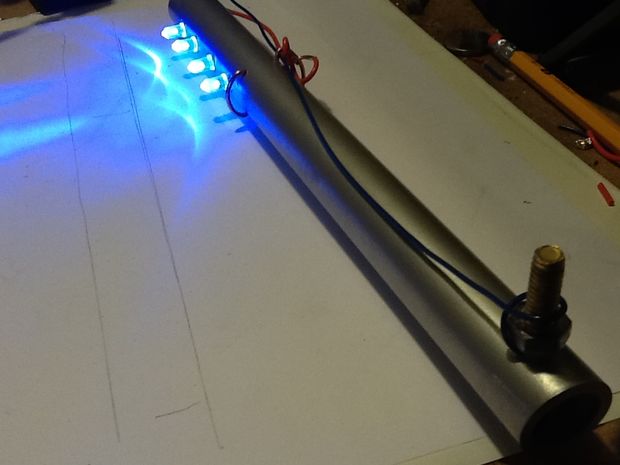
This project will use about 10″ to a foot of PVC pipe. Each battery is 2″ long, and you may need three of them to power the LEDs. (Only 2 are needed if they are 1.5 volts each). To better fit the LEDs and batteries, you'll probably want to measure. Allow at least half an inch at either end of the pipe.We will be using the bottom section of the tube (opposite the LEDs) as a battery holder, since each AA battery is roughly half an inch in diameter. A screw will be placed at the bottom and some thick wire near the top to make a good electrical connection.
Use a pencil to mark the spaces where the LEDs will be, as well as to mark some holes on each end of the battery holder section of pipe. One hole straight through the bottom, an appropriate size for the screw, and another set of holes across the top (I drilled four individual holes) to thread the thick wire through.
Step 3: Drill Some Holes and Paint
Use a drill bit roughly equivalent or slightly larger than the diameter of the LEDs. For the thick wire, drill a set of smaller holes closer to the diameter of the wire. Finally, drill holes in the bottom for the final screw. The thick wire will act as a positive terminal and the screw will act as the negative terminal.Step 4: Solder the LEDs together
Solder the set of 3-5 (I used four) LEDs in parallel, like a ladder. Add a length (a little more than half the length of the pipe) of red wire to the positive side of the LEDs. Add another length (a little more than the total length of the pipe) of blue wire to the negative side. The red will connect to the positive terminal of the batteries (that thick loop of wire) and the blue will connect to the negative terminal (screw).
After this, you'll assemble everything as per the complete instructions over at Instructables.
Wow! This is really an amazing DIY project, and we can't wait to try it for ourselves. This project proves that you don't always have to shell out a lot of cash at the store to buy what you need and can often make it quicker, easier and cheaper on your own. Very cool!
Article Source: Instructables