Here are all the tools and materials required to make this DIY air conditioner. It's surprisingly easy!
Materials to Gather
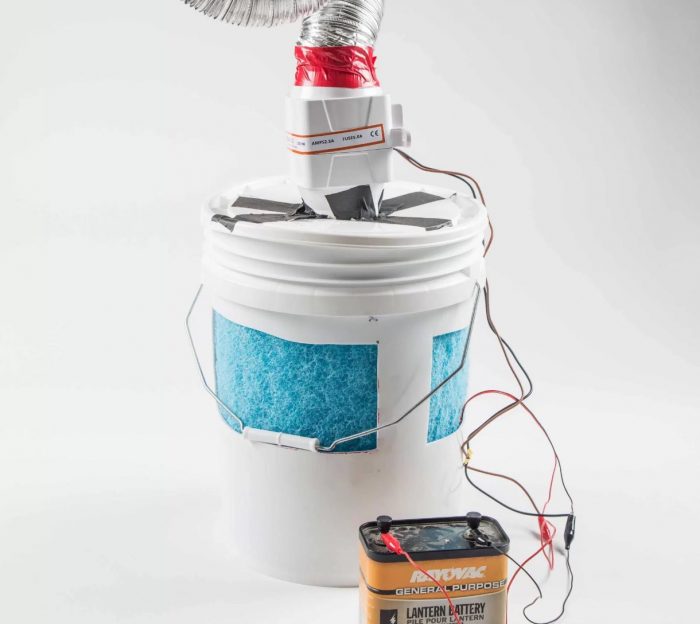
Plastic pail with lid, 5gal, about 12″ diameter by 14″ high
Fan or blower, 3″ diameter, 12V, 130 CFM We used an in-line marine bilge blower, Amazon #B00F7ANK7S.
Submersible fountain pump, 12V with ⅜” exit port
Vinyl tubing, ⅜” inner diameter, 5′ length
Flexible aluminum duct, 3″ diameter, bend-and-stay type
Evaporative cooler pad, polyester, 30″×13″×1″ such as Dura-Cool brand
Battery, 12V Our bilge fan draws 2.5A at 12V, so a rechargeable 12V battery rated at 7 amp-hours (7Ah) will last for nearly 3 hours.
Craft wire
Waterproof tape, 2″ wide
Bolt, ⅜”, ¾” long
Instructions to Follow
1. Use heavy-duty scissors, or a cutoff wheel in a handheld rotary tool, such as a Dremel, to make three 9″×4 1/2″ horizontal openings near the top of the bucket, equally spaced.
2. Use a compass to draw a 3 ¼” circle in the center of the lid for the plastic pail. Use heavy-duty scissors to cut out the circle.
3. Insert the round inlet duct of your fan into the hole in the lid, from the top. Fix into place using waterproof tape (Figure A).
4. Connect the flexible metal duct to the outlet of the fan using waterproof tape.
5. Insert the bolt into one end of the vinyl tubing. Use an awl to poke a hole every ½” in the tubing (Figure B), extending back 30″ from the bolt.
6. Insert the cooler pad into the bucket. If necessary, trim it with scissors so it fits neatly around the bucket walls (Figure C).
7. Drill a pair of ⅛” holes in the bucket, one slightly above the other, just above the top edge of the cooler pad. Repeat every 90° around the bucket, for 4 total pairs of holes.
8. Set the plastic tubing atop the cooler pad, and secure it in place by inserting 4 pieces of 4″-long craft wire through the ⅛” holes and tying them off. Take care to keep the tubing section with the holes centered above the fabric.
9. Attach the submersible pump’s outlet to the plastic tubing and place the pump in the bottom of the bucket. Extend the pump wiring outside the bucket by running it under the fabric and out one of the 9″×4½” openings.
10. Fill the bucket with 5″ of water.
11. Place the lid with the fan on top of the bucket. Extend or direct the duct as desired. Connect the pump and fan to the battery (Figure D).
Have you ever used this type of air conditioner? What did you think of it? Would you make this DIY version? Share your thoughts in the comment section below.
Article Source: Make
It’s a homemade swamp cooler! Cool
Graeme Higginson