The spindles themselves are very straightforward tools.
Many people like to make rope out of plastic grocery bags, and you can make your spindles with this material in mind. Most of all, it’s important to make sure your spindles are sturdy. There are many options when it comes to the materials to use for making your spindle. One possibility is to make spindles with peanut butter jars, dowel sticks, and can lids.
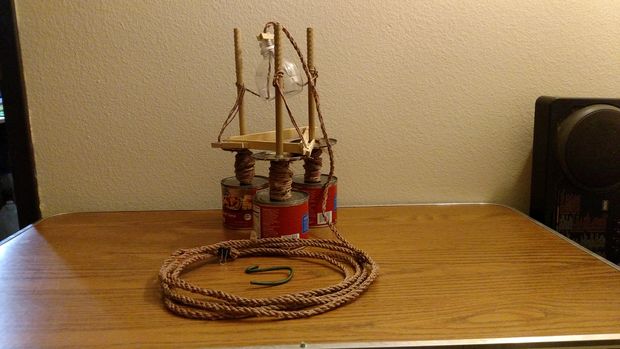
Step 1: The spindles
YOU WILL NEED:
1 – 3 Feet by ½ inch dowel (extra 1 foot long dowel if making 4)
3 or 4 Stew cans with their lids side cut
3 or 4 lids for the single lids (side cut lids)
3 or 4 lids for the cans (standard cut lids)
Five minute epoxy glue
Hot melt glue gun and glue sticks
Several pounds of something to add weight to the spindles.
Use a side cutter can opener to open your (washed) stew cans. Cut out the standard cut lids, one for each side-cut lid. Take one of the standard cut lids and lightly sand the inside of the lid to remove some of the plastic liner. Use epoxy glue to glue the standard cut lid to the outside side of a side-cut lid. Do the same to the other lids.
Once the glue has set find the centers of the lids. Using a step drill bit drill a ½ inch hole in the center of each lid assembly. Also drill a ½ inch hole near the edge of the lid. This hole is to fill the can with about one pound of sand, rocks, or whatever you have.
Cut the three foot dowel into three one foot lengths. Using the hot melt glue you will attach the dowels to the lids. Push one end of the dowel through a two lid assembly from the outside so that it sticks out of the inside side of the lid.
Put a good sized bead of glue around the dowel about third of an inch from the end. While it is still hot, move the lid back to the bead and drag it toward the end of the dowel. You want the dowel to be straight up with the lid so put the dowel on the edge of a counter and roll it back and forth. Adjust until the lid turns perfectly straight with no wobble. The hot glue will take a minute or so to set so you will have time for this. Add a good bead of glue to the outside as well. This part of the spindle will take a lot of lateral forces.
Measure 3 inches up from the lid and mark the dowel. This is where your second lid will go. Make sure it is a side cut lid. Attach it like you did the first one. When you are done you should have a dowel with a two lid assembly at the end and a single lid 3 inches away from the first lid.
Now along the edge of the single lid put some hot melt glue beads about a half inch apart. Now when you see the top end of the dowel you see a lot of hot melt glue beads. They are there to give you more grip when you turn the spindles. Use whatever pattern you like.
Sand the inside edge of the can to remove the plastic liner. Do the same to the edge of the can lid where it meets up with the can when they are together. Mix some epoxy and glue the lid to the can. Use some clamps or weights to hold it together until it sets.
Add the weight to the cans so that they weigh one pound each.
Step 2: The “Wrench”
YOU WILL NEED:
A flat-bottomed plastic bottle.
Note that will not have the appearance of a wrench, but will successfully fulfill the role of a wrench. Slice off the top and bottom of the bottle and use packing tape to tape them together. Space out your three holes evenly, ensuring that the holes allow enough space for the rope you will be making. The smoother you can make the holes, the less chance there will be of your rope snagging as you work.
Step 3: Starter Hook
YOU WILL NEED: 1 – 1/8 inch steel rod
Take a 1/8 inch steel rod and form it into an S shape. Or form it into whatever shape you need to hang it to a cross beam. As its name implies, the starter hook is used to start the rope but after your first couple of feet of rope are made you won’t be using it.
Step 4: Spindle holder
YOU WILL NEED:
3 – Clothespins
3 – Pieces of wood about 7” long
Take a paint stirring stick (large 5 gallon size sticks were used but the smaller 1 gallon size will work as well) and cut it in half lengthwise and then cut those to 7 inches. One end of each stick is beveled so that when they form a triangle there is a large surface area for the hot glue to hold them together. Also put a bead of glue on the inside of the glued parts for greater strength. Lastly, hot glue the clothespins as shown.
You will need a place to hang the assembly and it has to hold about five pounds or so.
Step 5: Make your rope
For a four foot rope you will need:
6 grocery bags.
Cut your bags. The handles and the bottoms of the bags are cut off leaving the middle. The middle is cut in half and the resulting rings are daisy chained together. Make 3 sets of 4 each. Because the knots will show, you have to position the strands so the knots are spread evenly along the rope. That means that 2 of the strands will have to be cut to make that happen. The pictures show how to cut the strands. Then the cut ends are then attached to the other end of their strands to even out the strands. The three strands should be the same length.
While the cut ends are being attached now, in normal practice the cut ends are saved and attached just before the rope is finished during the last spin set up.
Step 6: Hang it up
The strands are then put through the “wrench” and a knot is tied to secure the ends. It is then put on the starter hook and secured with a cloth pin. Hang the hook and then in turn start winding the strands on the spindles. Attach the strands with a clip to the single lid and then just wind on until you get to the point that the spindle will hang at its lowest point. Now those beads on the edge of the single lid come into play. They are there to prevent the strands from slipping on the smooth edge and unwinding accidentally. Secure the strand with a loop and let it hang. It’s important to make sure that your spindle holder and spindles remaining stationary until you are ready for the next step.
Step 7: Spin…Spin…Spin
Begin with one spindle and spin it in whichever you prefer as long as all three are spun the same way.
As you spin the strand will get shorter and you will see the creases start to form an angle. You want to spin until the creases are at a 45 degree angle. Attach the spindle holder to the strand just above the single lid and attach one of the other clothespins to whatever you are using to prevent the spindle holder from turning. Do the same thing to the other two spindles.
When the last spindle is attached, the spindle holder assembly will hang free. You should notice that the assembly wants to turn. That is good. Make sure that the “wrench” is at its highest point possible and then let the assembly start turning. As it turns, slowly let the “wrench” come down and you will see the rope start to form. What may not be obvious is that as the assembly is turning it is also unwinding making the rope less tight. About half way down stop and give each spindle a few more turns and reattach it to the spindle holder and resume turning the assembly. Let it continue until the “wrench” is as low as it can get.
Step 8: Reset and continue.
Unhang the assembly and set the starter hook aside. Put a small clip on the end of the new rope or wrap with tape and cut off the knot on the end. Now use your new rope to tie a clove hitch knot and set it so that the “wrench” is as high as it can get. It is now hanging from its own rope. Remove the spindle holder then unwind each spindle so that you have again the spindles hanging at their lowest point.
If you wanted to make a longer rope you would simply end up repeating the process until you finish. If you need to stop at any point you can place a clothespin above your “wrench” to keep things in place until you are ready to finish.
Step 9: Finishing up
Once you have used up all of your strand material you are ready to finish up. Now is the time to attach the cut ends saved from step 5.
When unwinding the spindles during the last spin, make sure the loops comes down as far as possible. After spinning, allow the spindle make its way as far down between the handles as possible.
Secure the spot above the “wrench” with a clothespin. Go ahead and undo and remove everything below.
Congratulations! You have now completed your rope and probably done a good amount of recycling along the way.
To learn more about making your own rope check out instructables.