Here's what you need to know to make this push dagger. First, you'll start by gathering your materials:
A pattern for the blade
High carbon steel : I used XC75 High carbon steel because that's what I can easily find in my country and it's pretty cheap too.
XC 75 contains 0.75% Carbon, 0.55% Manganese and 0.30% SIlicon. It is mainly used to make blades, chisels and cutting tools. It needs to be quenched in oil between 790 and 810ºC / 1454-1490ºF (the color of the steel would be between red and bright red) and tempered for one hour between 200 and 300ºC / 392-572ºF (the color would be from faint strow to blue).
Be sure to use the right material and refer to the factory specifications of the steel you use.
An angle grinder with a cutting wheel or hand metal saw
Metal files and/or a 2×72″ belt grinder – a belt sander and/or a rotary tool
A drill or a drill press
Two 4 mm diameter brass pin
Two part epoxy
Hard wood for the scales (I used Paddauk)
Some clamps
#400, #600 and #1000 grid sand paper
Boiled linseed oil
A ruler, calipers, a permanent maker and a black sharpie pen
The first step is to measure the steel and cut it.
The steel I already had wasn't wide enough for the blade I wanted to make. So I had to modifiy my steel a little bit before starting the build. But, if you have a piece of steel wide enough for your pattern, you can skip the next steps and go directly to step 4.Step 2: Prep the Steel
1. My XC75 steel was 4mm thick, 6mm wide. I cut a 12cm piece with my angle grinder.2. I cleaned the surface with my 2×72″ with a #120 grid belt (you can use a palm sander or just sand paper).
3. I created a 45° bevel on the edges of the steel plate for the welding.
Step 3: Do Some Welding
1. I cut two more little pieces of steel to roughly create the shape I needed for the push dagger.2. I used my MIG welder to weld the three pieces together.
Step 4: Clean and Ready to Go
1. Once again, I used my belt grinder to clean the welds and the surface of the steel.2. At this point, I had enough steel to make the blade, so I glue the pattern with regular paper glue.
3. I sprayed a little bit of black paint to print the design of the blade on the steel and removed the pattern (but you can trace the shape of the blade around your pattern with a black sharpie pen).
Step 5: Drill, Drill, Drill
1. I punched the hole on the side of the blade and some more on the parts I needed to remove.2. I drilled two 4mm holes on the side of the blade, then used a 10mm drill bit to remove as much material as possible. This enabled me to easily reach spots hard to grind with an angle grinder and saved me a lot of time. Be sure to punch all the holes and use some oil to drill them. Set your drill at the lowest speed, specially with the big drill bit. It will probably smoke a little, but don't worry, it's just the oil burning. Pay attention to the material and if you hear a very clean sound, stop drilling the drill before it breaks. If you use a different type of high carbon steel or already hardened steel, you can normalize the steel before drilling it, it will make the steel softer and this step easier.
Step 6: Grind Roughly
1. I used my angle grinder to roughly create the shape of the Push Dagger.2. I refined the shape with my 2×72″ belt grinder (but you can also use a rotary tool or just files to do it).
Step 7: To the Final Shape
1. I used a rotary tool with a carbide bit to get the shape as close to my pattern as possible.2. Then, I used a stone to clean all the edges.
If you want to make a pair, clamping the two blades together enbales you to save a lot of time. You will only have to grind once to get two of them. Be sure to use clamps with soft or flat jaws to not dent your blades and you can also use doule sided tape.
Step 8: Prep for the Scales
Prep for the Scales
1. After careful measurements, I punch two holes for the scale pins.2. As I used 4mm diameter brass pin, I drill two 4.2mm holes. You need to be sure to have a little bit of room for the epoxy between the brass and the wood.
Step 9: Prep the Bevels
1. I draw the bevels on both sides of the blade with a sharpie.2. Then, I marked the bevels with a caliper. I marked 5mm bevels on the right and left of the blades on each sides.
3. To be sure the bevels will be symmetrical on both sides of the blade, I blackened the edge with a permanent marker.
4. Then I carefully measured the thinckness of the blade and marked the middle of it with my calipers.
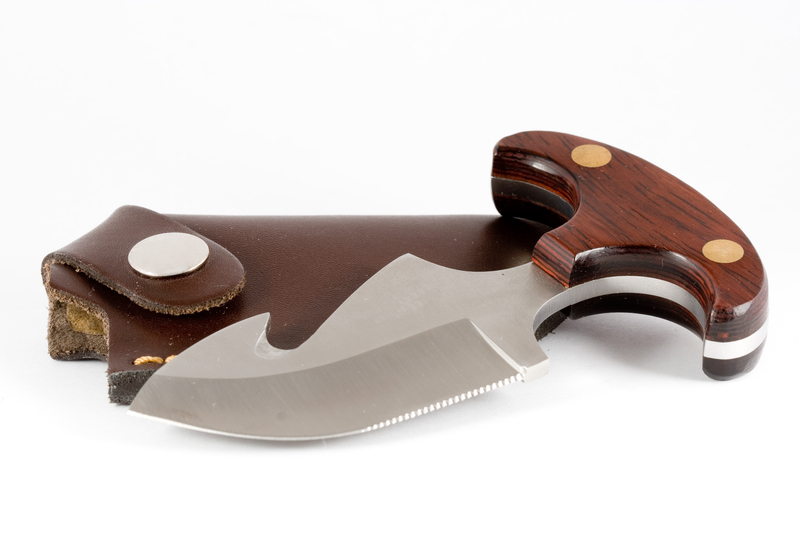
Next, use a file to create the bevels for the blade, and then quench the blade by heating it with a torch and then dipping it in oil. After this, clean the blade and then temper it by putting it in the oven for an hour at 446 degrees Fahrenheit. Then, let it cool before cleaning it again and then sharpening it. Finally, make your own scales by cutting pieces of wood or made pre-made scales, and then finish by gluing everything together, shaping the handle, sanding, and then oiling and cleaning the blade again. And you're done!
This may sound like a complex process, but trust us, it's well worth the effort. We recommend checking out the original post over at the Instructables website for additional detailed instructions, as well as a helpful instructional video.
Article Source: Instructables
Very handy and easy to sharpen