Gardening takes a lot of time and effort. However, many of us enjoy it because we take pride in what we are able to grow. Sometimes though when your planter bed keeps getting beaten down by rot, you may feel like giving up. This rot resistant raised garden planter bed is about to change everything. You'll be amazed at how easy it is to make!
Let's Get Started!
The Tools And Supplies You Need To Gather Are:
1 – 4″x4″x 8′ pressure-treated post
3 – 8″ x 12′ hardi-plank
6 – 1″ x 1 1/2″x 12′ cedar planks
Box of 1 1/2″ galvanized fastener nails
8 – 2 1/2″ wood screws
Miter Saw
Table Saw
4- finial post caps
Drill
Drill bits
Hammer
Finish nailer
1″ and 2″ finish nails
Paint
Paint roller
Compost
Tomato, Herb and Vegetable Plant Food
Cut List:
2 – 8″ x 12′ hardi-plank cement siding
2 – 8″ x 3′ hardi-plank cement siding
12 – 1″ x1 1/2″ x 5″ cedar trim
4 – 1″ x1 1/2″ x 38″ cedar trim
4 – 1″ x1 1/2″ x 12′ cedar trim
8 – 4″ x 4″ x 12″ pressure treated posts
2 – 2″ x 4″ x 3′ pressure treated lumber
The Step By Step Directions To Follow:
Cut lumber per cut list Cut Hardi-Plank siding to size.
Paint siding the color of your choice. Allow to dry.
Line up four 4″x4″x12″ posts on ground. Lay hardi-plank siding on top of posts. Line up siding with bottom of posts. Space one post at each end and two posts in middle. The middle posts will line up at 4′ and 8′
Nail siding to 4″x4″ posts. Be careful not to nail the nails too deep or it will crack cement siding.
Repeat for opposite side.
Lay out cedar trim pieces on top of siding.
Nail 12′ lengths of cedar trim to top and bottom.
Nail 5″ pieces on sides and at the 4′ and 8′ mark.
You should have two sides of planter bed completed now.
Position two sides 3′ apart. Line up 3′ section of Hardi-plank siding against the edges of 4×4 corner posts.
Nail siding to corner posts.
Line up one of 1″ x 38″ pieces of cedar on bottom of siding. Nail it into place with finish nails.
Nail 1″ x 5″ cedar trim pieces over ends of siding and into adjoining sides of planter bed.
You may have a slight gap, but that’s okay.
Position remaining 1″ x 38″ piece of cedar trim at top of siding, secure with finish nails.
Repeat for opposite side.
Before filling planter beds with dirt, secure two 2″ x 4″ x 36″ support pieces inside planter with 2 1/2″ wood screws.
The support pieces are installed at the 4′ and 8′ location inside planter. This prevents sides of planter bed from bowing out.
For a decorative touch, drill hole into 4×4 posts of planter bed.
Add final post cap to corner posts.
Tips for Planting Your Garden:
Fill your planter with good quality compost. Ideally, you’ll want to use EcoScraps Raised Bed Garden Mix.
The EcoScraps Tomato, Herb & Vegetable plant food can easily be spread by hand around your plants…
…or you can work it into your soil before planting.
Add plants to raised bed.
Water plants, soil well. Water daily until plants are thriving. Then keep an eye on them, water when the soil starts to dry.
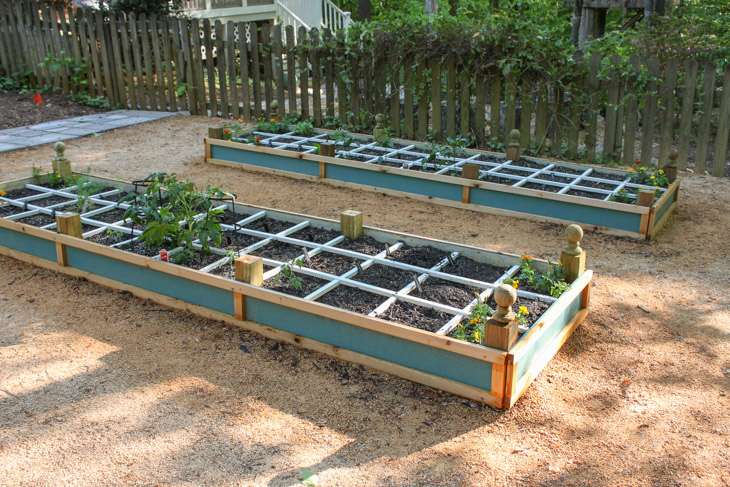
Finished!
This rot resistant raised garden planter bed is so easy and looks so great, you may just want to build several more for all of your plants! Have you made this rot resistant garden planter bed yet?
Let Us Know How It Turned Out For You!
Article Source: Pretty Handy Girl