The first step, of course is safety. The second step details all of the tools and materials you'll need for the project, which you can find by reading the original article. Once you've gathered everything you need, you're read for the fun part:
Step 3: Assembly
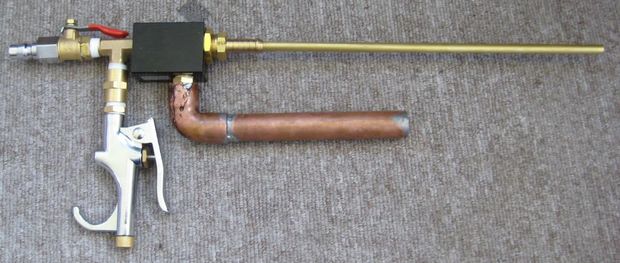
Follow the instructions on the diagram to assemble the parts. Wrap every joint with 3-5 wraps of Teflon tape, and screw them together. Tighten with a wrench. The hardest part of this is the wooden spacer. The wooden spacer is cut from a 2 by 4 and held in place with a hose clamp. Tighten the hose clamp with a screwdriver. If you don't want to go through the effort of making that piece, replace the 1″ by 12″ nipple with a 1″ by 6″ nipple. This puts less stress on that connection, eliminating the need for a hose clamp, but the power of the air gun will be reduced.
Step 4: Shooting
Load your ammunition. Attach your air compressor or any air source with a 1/4″ female air compressor coupler to the 1/4″ air compressor plug on the gun. Open the ball valve. Fill the gun with air. Close the valve and disconnect the air source. Aim at your target and open the ball valve to fire. AA batteries fit perfectly in the barrel, but be careful, as they will easily penetrate thick plywood. Feel free to experiment with all kinds of ammo!
Doesn't this sound like an exciting DIY project? We can't wait to try it out for ourselves, and we just love that you don't have to be an expert to make this easy and simple compressed air gun!
Article Source: Instructables
Not practical. Waste of time.
Clean your keyboard
Only works with a compressor