You used to see outdoor kitchens much more often than you do today. People would have them on their patio and/or by their pool. You could grill out and serve food without constantly having to enter and exit your home. This DIY outdoor kitchen brings that concept back to life, but tailors it to canning. Don't worry, you won't need to remodel your current space or spend thousands of dollars getting top-of-line equipment. When you're done with canning for the year, you can take your outdoor kitchen and store it away for the winter. All it takes is $100!
Basic Setup
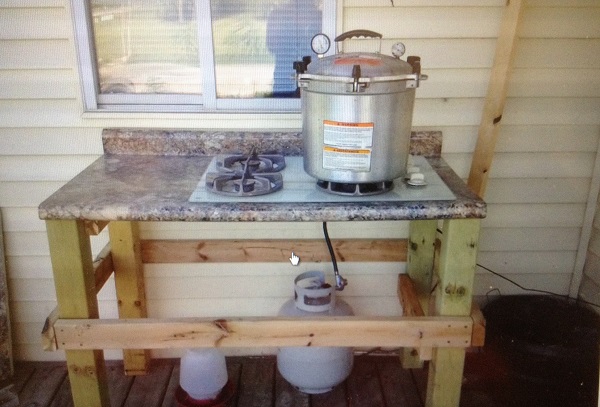
While you can use an old-fashioned wood cook stove to equip your canning kitchen, most people opt for the convenience of large portable propane burners. A simple high output propane burner (55,000 BTU or more) is available for under $40, and can connect to a standard exchangeable propane tank.
A second, small scale camp stove to cook up your preserves is a necessary expense, as a high output burner would quickly burn preserves and wreak havoc on your small saucepans.
Assuming you already have canning jars and pots, the only other thing you’ll need is a propane tank for about $40. All total, for about $100 you have the basics of an outdoor canning kitchen.
Canning on Wood Heat
If you’d like to further reduce your ongoing costs, or simply avoid the use of fossil fuels, it’s easy enough to can outdoors on wood heat, or with a hybrid method.
If you’re truly looking for the best long-term outdoor canning kitchen solution, try a dual-fuel wood and gas stove. With a dual-fuel stove, you’ll be able to use wood as your primary heat source to bring canning water to a boil, but still use a more gentle heat from a small gas burner to gently cook down jams and jellies before they go into the water bath.
Temporary or Permanent Canning Kitchen
A semi-permanent option with a tarp or tent canopy roof means that you can leave your materials outdoors and can several times a week without exhaustive setup time. A simple sink built into a 2×4 framed countertop can be plumbed in with a garden hose.
If you can afford it, the best option is a permanent screened-in outdoor structure that has a solid roof and fully screened walls to protect you from the elements and unwanted pests.
Have you set up an outdoor kitchen? Do you have any other tips for outdoor canning?
Article and Photo Source: Off The Grid News
Hey Chelsea Franklin check it out. We will be need in this at the end of the season 🙂
Jason Fox
Tosha Hohmann
Here is mine.
Robyn Yeaman
I’ve never done any canning outside; is there a concern about hot glass jars being exposed to a cool breeze?
Jenni Panosh
Cyndi Clark- Johnston
I bet the granite was 80bucks, 2x4s 15 bucks
Get it out of dump for free
Leave them in water till your ready to pack cool them in a empty crate then pack them to storage.
Justin Gilbert
It’s not granite
George Phillips
Bridget Feldman- maybe we should do this.
Larry Hopkins
Damn good idea