If you're someone who is looking to get into blacksmithing these are some essentials that you need to know. So read them over and commit them to memory and let us know what you think in the comments below.
Hammers and Long Handled Blacksmith Pliers:
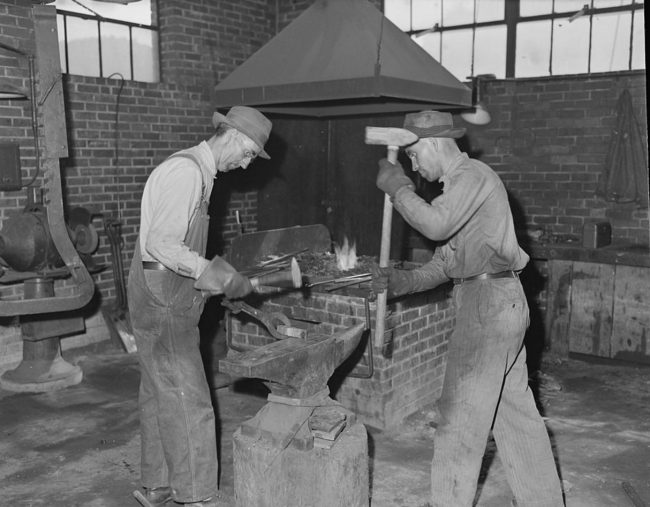
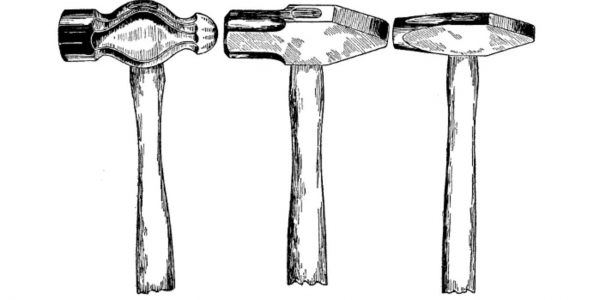
So first let's start with the hammer. Please do not try and use a regular everyday hammer to bend white hot metal. This really should go without saying but you'd be surprised.
If you’re working with metal you’ll want a few heavy machinist hammers, and at least 1 Ball Peen or Flat Peen hammer. This will make life immeasurably easier when working with the anvil and leg vise. In addition to this, if you’re going to be doing any “forge welding” (a process described later) you’ll need a large, heavy, long-handled sledge hammer.
A Hardy Log:
This is something that every blacksmith needs. I wouldn't overthink this one too much. Going into the woods and finding yourself one is just as good, even better, than going out and trying to buy yourself one.
Logs are usually my first choice when it comes to equipment racks due to their surprising resistance to the heat of the forge.Bach Ritterburg Tool Pliers
BlacksmithAnvil:
Now we are getting to the heart of the matter. You can usually find these on Amazon or Craigslist unless you are lucky enough to have a friend who has an old farm as most old farms have these laying around somewhere.
Though there are many types of anvils out there, I’ve found that farrier’s anvils are set up the best way for bending metal. Rather than just giving you a flat surface, they give you a jutting horn with which you can bend your metal, and overall provide an easier platform for turning iron and steel into malleable putty. They also have strategically placed holes in them for the purposes of adding tools and attachments to your anvil should you choose.
TIP: you should invest in a good floor-mountable vise grip that can be quickly closed; this makes handling and bending metals easier.
The Forge Itself:
Any good forge should be made of heat-resistant firebrick. Again that should go without saying but we have heard too many stories of people trying to build forges with other kinds and well, it just goes all kinds of wrong. Asking for bricks that go inside kilns is usually far cheaper than buying blacksmith-specific ones, with the same results.
The Forge itself can look however you want, so get creative! As long as you keep a few elements consistent you will be fine.
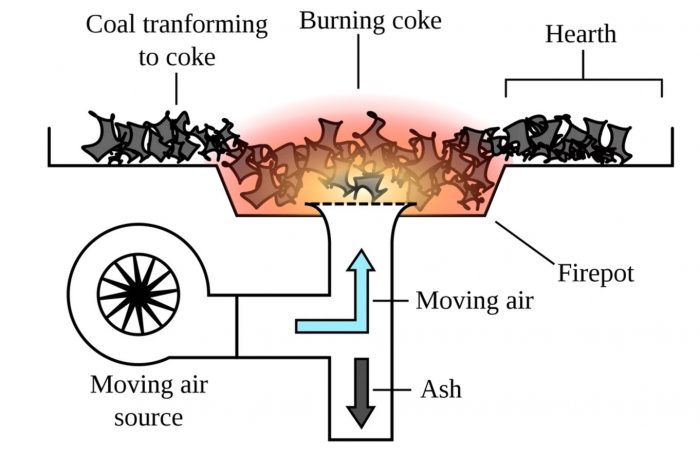
- There has to be an air source, which sends air through the tuyere and into the firepot.
- Your fire itself should be made of coking coal, which takes a little bit to heat up.
- Soft coal is typically the easiest to purchase for this purpose, and it gets far far hotter than its hard counterpart.
Your air source doesn’t have to be a bellows, and there are plenty of electronic solutions in the modern world, but a hand-operated-blower is actually usually far better for keeping your fire going at the right temperature
A Partner:
Yes, this is important. In fact, as far back as the art goes there are usually two people working. one apprentice working the bellows, and one master smith actually heating and manipulating the metal.
Even if you’re not working with forge welding, having a partner is important for safety reasons, and just because it’s always fun to have someone to talk with while you’re hammering away.
Quenching Bucket:
This one is pretty self-explanatory. You don’t need an oil quench bucket or heat sink if you’re not forging high-grade steel, so if you’re just starting out, a simple wooden or metal bucket filled with water will work perfectly for quickly cooling down your crafts and forgings.
Important Extra Bits and Pieces Undeserving of their own Category:
• Anhydrous Borax: This is necessary for forge-welding
• Large Rasp/File: This is for filing down burs. Even if you don’t need it initially, you’ll need it as you progress.
• Forge tools: These are for moving and manipulating the coal. They can be little more than a long handled rake to move around the coal or a long piece of metal that you can use to shovel the coal into the firepot.
• Clinker Breaker: These are incredibly important and often unused in forges. Clinker Breakers are used to break up the little deposits of metal that will colelct in the bottom of your forge. They can be purchased online, and are essential to keeping your tuyere and firepot clean.
• Safety Equipment: For the love of goodness, please get yourself a decent blacksmithing apron. This will keep motel metal, sparks, and burning coals off your body, and trust me, you don’t want any of those things hitting anywhere vital!
Source: Make
Andy Carter
Good read thanks buddy
Brian Graham
Joe Belden
Never will be a dead art, just constantly under appreciated. Just because people may not have large equipment for producing their own armor or blades doesn’t mean they shouldn’t learn to take small scrap metal and make hardware or hand tools.
My son is working on blade smithing and he’s getting pretty good. I’m proud of him
Michele Ziemba-Bolduc
Kathy Peveto George, reminds me of Pawpaw. Did you know he was an ambulance driver too? Maggie Nelson
No. I never knew that.
My husband is a blacksmith. Smithing for 30+ years. Has his own business – he manufacturers custom made firescreens, andirons, firegrates and reproduces wagon parts for a local business man who restores wagons. Inbox me if you are interested in anything “iron”. 🙂
Tony Rehrig
thanks, will read this soon!
Who else thinks is cool
Raymond Liles