Bird watching is a relaxing and interesting hobby for most people. However, getting the birds to be close enough where you can see them can be challenging. You can solve this problem by having a bird feeder. These steps for making a bird feeder out of a mason jar will help you build one that you and the birds will love!
Let's Get Started!
The Tools And Supplies You Need To Gather Are:
Saw: If you don't have a bandsaw, you can use a regular hand saw, chain saw.
Drill Press or Electric Drill
Drill Bit (large): Bit should be a little larger than whatever rope you use so the roof can slide up easily.
Drill Bit (small) or Punch
Forstner or Spade Bit: The bigger the better. We used 1-1/4″ forstner bit.
Hot Glue Gun: For securing knots, hook.
Wire Cutter
PliersLog: We used a 9″ diameter black ash log.
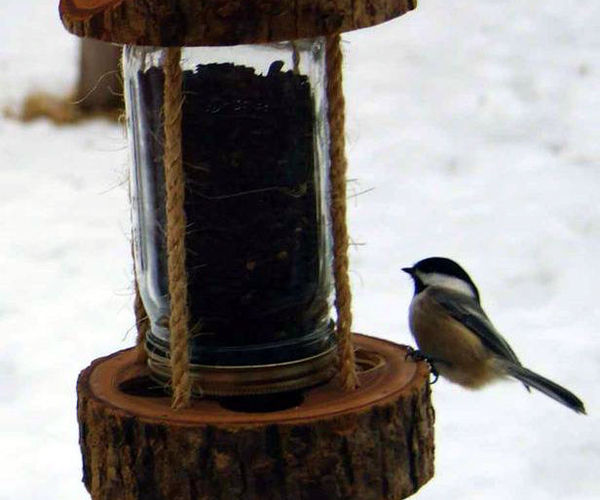
Wide Mouth Quart Mason Jar with metal ring.
Screws: You will need (4) four small brass screws
Sanding pad and/or sandpaper: To sand off base and roof slightly
Spar Varnish: To be applied to roof only. You can either spray some on, or paint it onto the roof. Spar varnish has UV protection and is perfect for wood that will be outside.
Mineral Oil: This will be applied to the base and must be bird-friendly. Food grade works best.
Rope: I used jute because of its rustic appearance.
Wire or Coat Hanger: Heavy gauge wire to make the hook or loop on top.
Paper: One sheet of paper to make template for rope holes
Pencil: To mark on wood.2 Cutting Log
Use regular vice or clamp to hold y log while cutting, but most likely log will be too large to fit into a regular workbench vice or clamp. You can use ratchet strap to hold log down to another piece of wood, sawhorse, or to table with the end of log extending past edge. The cut will come out more accurate, you won't damage blade. Use either basic ratchet strap, or make strap clamp out of scraps of wood, ratchet.
The log used for this project was about 9″ in diameter. The base log is just simple flat cut, about 2″ thick.
Cut roof log about 4″ thick to allow for roof peak. I tilted table on bandsaw to maximum tilt, which is about 45-degrees. I eye-balled cut for roof, ran it through, making two cuts for peak of roof.
It is not necessary to have a peaked roof. You can also have a flat roof, which will make this project a lot easier, especially if you don't have a bandsaw. Just make another log slice about the same thickness as the base log.
3 Template For Rope Holes
Take piece of paper, trace around base log. Cut out paper circle, fold into quarters. Cut notch in edge of t quarter-fold about an inch from edge. Unfold, lay out onto log base.Using notches as guide, use pencil to make mark through each of notches onto base log. These will be your marks for drilling holes for rope to go through. They should be equally placed. Be sure that mason jar will fit between marks.
For roof, make marks on bottom of wood, being sure that marks are positioned at thinnest parts of roof , get them as equal as possible. The holes will be drilled all the way through and visible on top.
If you did not make a peak on your roof, you do not have to worry about this. Just place the template onto the flat roof the same way as you did for the base.
4 Seed Cups
Use a ruler and connect the dots on the base log. This will give you the center.Note: Find actual center of log or feeder might not hang straight.
Place metal jar ring in center of log, trace around it. Use a soft lead carpenters pencil to make your marks.
The main point is to find center of the seed cup so you know where to align forstner/spade bit. Center round object on ring mark, between quarter lines. You can also use a protractor, or better yet just put a mark (dot) for the center of the seed cup to line up the forstner/spade bit.
The key for positioning tseed cups is to allow just enough seeds to flow into cup, to allow enough of cup on outside for birds to get seeds. Dead center seems to work best.
Suggestions:
Center the seed cup on the metal ring mark.
Make larger seed cups.
This will allow larger bird seed to fall freely, and still have plenty of the “outside” cup for the birds to feed from.
Make two large seed cups instead of four smaller ones.5 Drill Holes
I used a drill press to drill rope holes, seed cups. You can use an electric drill.ROPE HOLES:
Use drill bit that is slightly larger than rope you will be using. The roof must be able to freely slide up and down on rope to refill feeder.
BASE: Going by your marks from paper template, drill rope holes into base.
ROOF: Drilling rope holes through roof is a little trickier. For peaked roof, you will need to turn it upside down, drill from bottom of roof up through top. I simply set the roof, upside down, on top of my drill press clamp and held it with my hands while drilling the holes. It is very important that after you flip roof upside down that flat part be as level as possible. If it is not, rope holes will not come at right spots on top and it won't look right. If you don't have a drill press, you can strap roof down on its side to a bench or table, use electric drill. Line y drill up so that you drill as straight as possible.
SEED CUPS:
Clamp feeder base to drill press to hold base steady. If you don't have drill press, have someone help to hold log so it doesn't move while drilling. Using a forstner bit or spade bit, drill seed cups approximately 3/4″ to 1″ deep.
DRAIN HOLES:
Put drill bit back into chuck, drill drain hole in center of each seed cup. It won't drain all of the water, but it will help. Give it a little drainage. Be sure to scrape or brush out seed cups when you refill feeder so drain hole isn't plugged up.
6 Protect Wood
BASE: To protect the base, use only Food Grade Mineral oil.
ROOF: I sprayed top of roof with Spar varnish. Spar varnish has UV protection, expands and contracts with temperature changes instead of cracking like typical varnishes, and is specifically designed for outdoor projects. This will greatly prolong the life of the feeder. You can either spray it on or paint it on.
7 Attach Ring To Base
Center ring onto base. Drill or punch four small holes in ring. Also punch small pilot hole into wood to make it easier to get screws started. Using four small brass screws, screw ring onto base. Brass doesn't rust.8 Adding Rope & Hanger
Cut four equal lengths of rope a little longer than you will need. I think mine were about 3′, but could have gotten by with 2-1/2′. Cut them long enough so roof can slide up a few inches to remove jar when filling. Tie knot at one end of each rope. Use hot glue gun to put a few dabs of hot glue in knot to keep it from loosening. Trim bottom ends to equal length, fray rope if desired.
Feed ropes up through base, up through roof. The knots go on bottom.
Screw t mason jar onto ring.
Grab t tops of all four ropes, suspend feeder. Adjust so feeder hangs straight. Hold ropes tight.
Take small piece of wire to use as a temporary staple to hold ropes together at “level” position. Press wire with pliers to hold ropes tight so they won't slip while we wrap the rest of the wire for the hook.
Cut apiece of heavy gauge wire or coat hanger about a foot long. Fold in half.
Make loop in center, twist rest of wire together to add strength.
Use pliers to bend bottom ends of wire so they don't pull out over time.
Position wire in center of four ropes, with loop on top.
Take piece of wire, start wrapping four ropes, wire hanger together. I added hot glue during this process to help keep the ropes in place while wrapping.
Wrap wire around rope for about an inch.
Cut off remaining rope at top of wire wrap.
Apply hot glue to ends of rope. This will help shed water and to secure the hook.
9 Notes
TO PERCH OR NOT TO PERCH:Although not necessary, you can also add a perch to the feeder base by drilling a hole into the side and inserting a wooden dowel or stick.
NO LOGS, NO PROBLEM:
You can still build this bird feeder using regular square wood. You may need to glue some wood together to get a large enough piece. Just make the base and roof whatever size you want and follow the rest of the directions.
This mason jar log bird feed is so simple and works so wonderfully, that you might just want to have a few of them! Have you made this mason jar log bird feeder yet?
Let Us Know How You Liked It!
To find out more about how to make your own mason jar long bird feeder, you can go to: