Many people like to use wood, steel and a bunch of other materials when they are building. However, working with these materials can be challenging if you don't have something to help you hold them. This incredibly easy and amazing drill press vice will make all the difference. You will be amazed by how helpful it will be!
Let's Get Started!
The Tools You Need To Gather Are:
Table Saw
Mitre Saw
Angle Grinder
Drill
File
Hammer
The Step By Step Directions To Follow:
1 Vice Screw, Handle
I decided to replicate the handle on a traditional drill press vice with the swivel joint on the end .
I used 12mm threaded rod and a short (60mm) piece of 12mm bar. Use angle grinder to make slot in end of threaded bar. Use file to create tongue on end of bar, to slot into threaded rod. Round over end of tongue so it could swivel in slot. After drilling hole through both, cut off end off nail, leaving 3mm, put it through both pieces, pound end over.
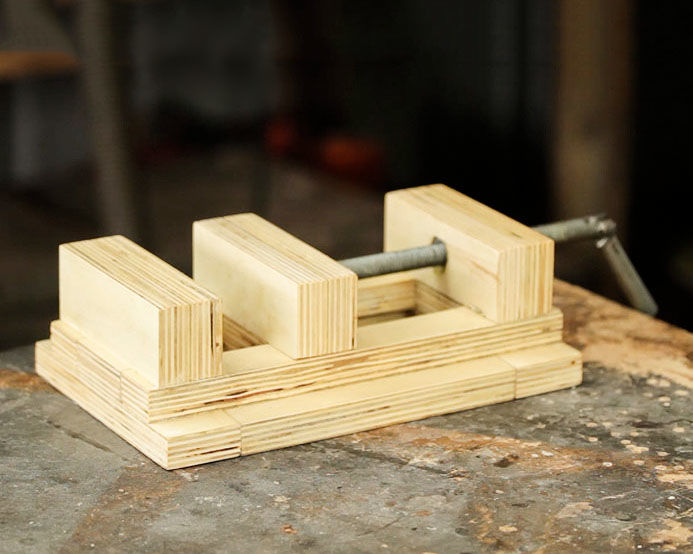
2: Cutting Plywood Parts
I used 17mm plywood but anything around 3/4″ plywood would be fine. Rip strip of 40mm ply on tablesaw (1.4m is needed),strip of 30mm ply (0.5m is needed), short strip (130mm) that was twice as wide as thickness of ply.
3 Assemble Vice
I assembled plywood parts with glue ,screws, pre drilling ,checking with a square.4 Moving Jaw
There are 6 pieces of 110x40mm – these will be glued together in a later step to make 3 pieces.First cut M12 nut in half, two halves will be housed inside moving jaw. Drill recesses in moving jaw. After finding centres,drill shallow recess in one side of jaw for M12 washer to turn freely, this needed to be just a touch deeper than the width of the washer. I made recess for two halves of M12 nut, in each side of jaw – this can be a couple of millimetres deeper than nut halves. On side I drilled recess for washer I drilled 13mm hole through piece.
5 Fixed Jaw, Screw Housing
The fixed jaw, screw housing got glued, clamped together.When dry, mark centre, drill 13mm hole through one piece, for vice screw. Mark around M12 nut, chisel out arecess, epoxy nut in place.
6 Moving Jaw Assembly
On end of vice screw, file two flats on opposite sides. The screw was put through screw housing, threaded through nut that was epoxied, it needed to go through piece of moving jaw with hole through. Put one of half nuts on to screw followed by washer, other half nut. Using vice, squash nuts onto flat parts of bar, leaving enough room for washer to spin. Nuts should not be able to turn off threaded rod. I glued two sides of jaw together.7 Sliding Guide
I measured, cut two pieces from 34mm wide strip of plywood. They needed to slide freely in rebate created in vice body. I held larger piece which should be around 70mm in length in rebate, marked two sides,then filed ends down about 1mm. This will raise two blocks slightly above vice body, enable moving jaw to move. The two pieces were glued together.
The Last Steps Are:
Make sure jaws are fixed.
Your fixed jaw and screw housing should be set with some glue and screws from underneath them. Then, you should pre-drill to make sure these pieces are square with your vice body. Then make sure the corners are rounded on your sliding guide to allow it to slide into your rebate, fix it to the moving jaw piece with some glue and a few screws.
Sand And Finish Up.
Once you sand, finish your vice with some beeswax polish making sure to add enough to all the moving pieces.
The drill was tested with a cordless drill so it can be used that way if you would like.
That's it!
As you can see, this homemade drill press vice is easy to build. You might just want to make more than one! Have you built one of these before?
Let Us Know How It Turned Out!
To learn more about making your own drill press vice, you can visit: