Here's everything you need to make this nifty motion sensor alarm clock. Step 1 involves gathering all of your tools and materials, which can be found in the original post at the Instructables website. Next, you'll need to install an operating system in the Raspberry Pi microcontroller you'll use for the clock. Now you're ready to begin:
Step 3: Installing the RTC
If your Raspberry is connected to the internet, you dont really need this. The Raspberry will pull the time and date from NTP servers. Currently the Raspberry pi 3 is the only on with built in wifi, so if your not using a Pi 3, i highly recommend using a RTC to keep the time 🙂
In the picture you'll see that the pins of the RTC are labeled.
We wont be using the 32K and SQW pin.
For the other pins the lay-out is as follows:
GND to PIN9
VCC to PIN1
SDA to PIN3
SCL to PIN5
Confused? Click here to the layout of the GPIO pins on the RaspberryWhen correctly installed a small red light should turn on. In the next step we'll start using the RTC to keep our time.
P.S. I advice on keeping your RTC inside the box along the Raspberry Pi
Step 4: Making the Raspberry Pi use our RTC
On the Raspberry Pi click on the terminal (Blackscreen icon with a right facing arrow followed by an underscore)
type: sudo nano /etc/modules
Add the following lines:
i2c-dev
i2c-bcm2708
rtc_ds1307
When done press CTRL+X and press “Y” and the EnterDo the same with: sudo nano /etc/modprobe.d/raspi-blacklist.conf
but this time enter a “#” before “#i2c-bcm2708”
Note: It is possible that this line is not present in your configuration. Dont worry it'll still work 🙂
Reboot your Pi
This can also be done in the terminal: simply type: reboot
After the reboot go back to the terminal and enter: apt-get install i2c-tools
After this is done use the command: i2cdetect -y 1
Different Pi's
This command can change per Raspberry Pi. Using a model 2? Keep the 1 in the command, if you have a model 1 change the 1 to a 0.
If everything went correct you'll see the same output as in the picture. But instead of UU you'll see 68.
Now we'll install the RTC, type: echo ds1307 0x68 > /sys/class/i2c-adapter/i2c-0/new_device
!Again the 0 in i2c-0 represents the model!
Step 5: Time to set the time
Time to set the time
when you've finally installed the RTC and the I2C tools its time to load the time onto the RTC.Type: sudo bash
hwclock -r
Reads the time from the RTC
hwclock -w
Writes the current system time to the RTC
We'll set the date with for example: date -s “24 JAN 2017 17:30:00”
write the time to the RTC and the last step is to say to the Raspberry Pi to use this RTC on startup.
use: sudo nano /etc/rc.local
type between fi and exit0, the following:
echo ds1307 0x68 > /sys/class/i2c-adapter/i2c-0/new_device
hwclock -s
Keep in mind that i2c-0 depens on what model you are.Leave the editor and you're done with the RTC 😉
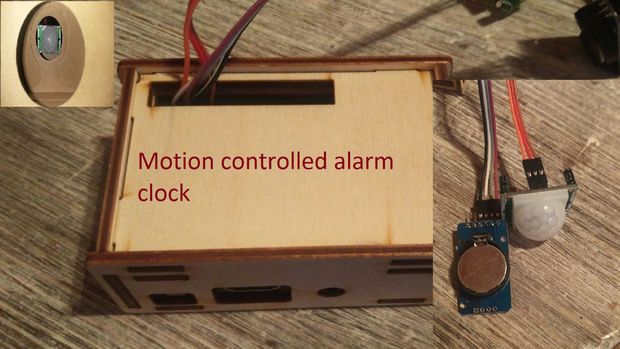
Step 6: Installing the PIR
Installing the PIR
Luckily the PIR is a breeze to install compared to the RTCThe PIR has 3 pins, the pinout is as follows:
Middle pin goes to PIN 7
The right pin (closest to yellow header) goes to PIN 9
The left pin connects to PIN 2
NoteYou've probably noticed that the PIR has 2 small yellow screws.
I've turned them all the way to the left. Your situation can differ, so you can play around a little with the senitivity.
Now it's time to program your alarm clock. This gets pretty technical, so we recommend looking at the original post over at Instructables for detailed instructions. Once you've programmed the clock, you can set a time for it to go off. And that's it!
Would you make this motion sensor alarm clock? Do you think something like this is necessary, or does a plain old-fashioned alarm clock work just fine for you? Share your thoughts in the comment section below!
Article Source: Instructables